
How to Add a Realistic Background in SketchUp & V-Ray
- Jack Dicker
- Jun 26, 2023
- 4 min read
Updated: May 2
Have you ever wondered how to add a realistic background in your SketchUp and V-Ray scenes?
Firstly, if you're loving our blogs, sign up to our newsletter now, HERE.
We recently received a great question from someone on our Complete Guide to V-Ray for SketchUp course. How do I add a realistic background in SketchUp & V-Ray?
Adding a realistic background in SketchUp and V-Ray can make a huge difference in the quality and appeal of your scene, whether it’s a cityscape, a mountain range or a forest. Backgrounds add depth, context and interest to your scene, as well as hide unwanted elements or fill empty spaces.
But how do you add a realistic background that looks natural and seamless with your model?
"In this blog post, we will give you the 10 simple steps that we use to create a realistic background in SketchUp and V-Ray."
How do you avoid common pitfalls and mistakes that can ruin your render?
And how do you do it quickly and easily without wasting time and resources?
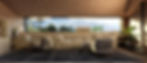
In this blog post, we will give you the 10 simple steps that we use to create a realistic background in SketchUp and V-Ray. We will focus on how we created the view across the valley in our Palm Springs project using a billboard with a transparent PNG image.
This is one of the most common and effective ways to create a backdrop view, but surprisingly, very few people talk about how it is done! By following this tutorial, you will be able to create your own backdrop views in no time and impress your clients and colleagues with your renders.
So, are you ready to learn how to add a realistic background in SketchUp & V-Ray? Then let’s get started!
Step #1 - Source a backdrop image
Find a backdrop image that you want to use. You can use your own photo or download one from the internet.
Pro tip: find an image that was taken at a similar eye height to the camera angle that you plan on selecting. This will make your backdrop view more realistic and consistent with your model and scene.
Step #2 - Preparing your backdrop
Open your image in an image editing software (we use Photoshop).
Select the sky and delete it.
There are many ways to do this, such as using the lasso tool, the magic wand tool, the quick selection tool, etc. Use whatever tool you are more comfortable with. My personal preference is the magic wand tool, as the sky is normally lighter than the landscape, which makes the magic wand easier to use (it can differentiate between light and dark).

Step #3 - Push the save button
Save your image as a PNG file.
This is very important, as PNG files can preserve transparency, unlike JPEG files. This way, you can see the V-Ray clouds and sky above your image when we go to render.

Step #4 - Import into SketchUp
In SketchUp, go to File > Import > select your PNG image and import it “as an image”, not “as a texture”. This will create a 2D face with your image applied to it. You can use the Scale tool, the Move tool and the Rotate tool to manipulate the face and the image.

Step #5 - Position
Stand up your image and use a combination of move, scale and rotate to position it roughly in the right area behind your model. Aim to cover the entire view and matches the perspective and scale of your model and scene.

Step #6 - Resolve your view
Resolve your view and save a scene. You can use the Position Camera tool, the Look Around tool and the Zoom tool to adjust your camera view. You can also use the Scenes panel to save different views of your scene. From here, perfect the positioning of the backdrop to suit your view.
Pro Tip: When moving your backdrop, focus on aligning the horizon line with the SketchUp horizon (as this is a nice and clear reference point) If you need to, go into X-Ray mode (View > Face Styles > X-Ray) to get these aligned as perfectly as possible.

Step #7 - Curved billboard
If you have multiple views and the view looks strange from some of them, you may want to project the image onto a curved billboard. This will give a more natural perspective and avoid stretching or clipping of the image.
To do this, model your curved billboard and try to match the dimensions of your original billboard. You can use a combination of the Arc tool and Push/Pull to create a curved face.

Step #8 - Position
Now explode your flat billboard image to convert it to a texture. You can do this by right-clicking on it and selecting Explode. You can now paint this texture onto your curved billboard using the paint bucket. If your material isn't wrapped correctly onto the curve, head up into the V-Ray Utilities toolbar and you'll see some UV wrapping tools which will deal with this.

Step #9 - Match the lighting
Pro-tip: ensure your lighting conditions in your V-Ray scene match (or are very close) the conditions at the time the backdrop photo was taken. This will avoid incongruency and the viewer losing trust in the image. There are several ways to adjust the lighting, however, the easiest is to use the custom sun orientation in the Asset Editor to match it perfectly.

Step #10 - Test
Run a quick test interactive render for one last check, and you’ve done it!
... and that's how you add a realistic background in SketchUp & V-Ray!
This is how we add a realistic background to our SketchUp and V-Ray scenes. Those of you that have participated in our self-paced Complete Guide to V-Ray for SketchUp course will recognise the backdrop in our Palm Springs Project.
If you want to improve your V-Ray skills, whatever your level - feel free to check out the course or register your interest by signing up to our mailing list for more free tips and tricks.